Looking for a guide on how to set up your audio interface?
Well, you’re in the right place.
In this post, we’ll walk you through the audio interface setup process – from connecting your cables and configuring its software to fine-tuning key settings for optimal performance.
Whether you’re setting up your interface for the first time or troubleshooting an issue, this guide will help you out.
First, let’s begin with the equipment and cables you may need to get the most out of your interface.
What you Need to Set Up an Audio Interface
Basics
USB or Thunderbolt cable
Computer with a USB or Thunderbolt port
For Music Production
- Studio Monitors and/or Headphones
- Two Balanced TRS cables
- Optional: A guitar (or similar instrument) and a ¼ inch TS cable
For Audio Production
- A microphone
- An XLR cable
- Studio Monitors and/or Headphones
- Two Balanced TRS cables
- Optional analog gear: microphone preamplifier (mic preamp), compressor, equalizer, audio mixer
How to Set Up Your Audio Interface
Step 1: Connect your USB or Thunderbolt cable to your computer and interface
Step 2: Install the latest audio driver from your audio interface manufacturer’s website
Step 3: Connect studio monitors or headphones to your interface for playback
Step 4: Connect a microphone, guitar, or other instruments for recording
Step 5: Connect analog gear, if necessary
Step 6: Open your DAW
Step 7: In your DAW, go to Option/Preferences > Audio (Settings) > set your input/output device to your audio interface
Step 8: Adjust your sample rate and buffer size, if necessary – for best results, in most cases, set your sample rate to 44100 Hz (44.1kHz) or 48000 Hz (48 kHz) and buffer between 128 and 256 samples.
Setting up an audio interface is generally the same regardless of the brand.
The easiest part is connecting your cables and equipment.
Things can get a bit more technical when downloading the software that comes with your device.
We’ll walk you through how to set up the software and even provide some tips for setting your sample rate and buffer size.
For now, let’s start with the basics.
Plugging in Your Interface
Assuming you have a USB audio interface, connect one end of your USB cable into your interface and the other into your computer.
The setup process is similar if you have a Thunderbolt audio interface. The only difference is, you’ll need a computer with a Thunderbolt or USB-C connection port.
Installing the Software
Once you plug in your interface for the first time, your computer’s operating system should recognize the device.
From there, your computer should start downloading the appropriate driver.
Regardless, it wouldn’t hurt to head to your audio interface manufacturer’s website. Check if they have a more recent version.
Why You Should Install the Latest Audio Driver
An audio driver is a software program that enables the communication between an audio interface and a computer’s operating system.
It allows a computer to recognize an audio interface and use its inputs and outputs for recording and playback.
Manufacturers update their drivers from time to time.
They release updates to fix bugs or glitches found the in the previous version and improve performance.
They also ensure that the latest driver is compatible with new operating systems.
Installing the latest driver is crucial for getting the best performance from your device.
Types of Audio Drivers
MacOS uses the Core Audio driver while Windows uses ASIO, MME, WDM, or WASAPI.
For audio recording on Windows, if your default driver isn’t ASIO, we recommend using the third-party ASIO4ALL driver.
Some interfaces use other options, but ASIO provides the lowest recording latency.
You can download it here.
Now that you have your interface plugged in and software installed, you can start connecting your audio gear.
Connect Your Analog Gear
As you may know, an audio interface is a link between the analog and digital worlds.
Your interface allows you to connect analog devices like microphones, guitars, and studio monitors to your computer for recording and playback.
You can even hook up a mixer, mic preamp, and/or compressor if you’d like to get more technical with your recording setup.
Studio Monitors
Placing Your Monitors
Before connecting studio monitors to your audio interface, position each monitor around 3-5 feet from your listening position.
We recommend placing them at the same distance (3-5 feet) from each other.
For the best listening experience, you’ll want to create a symmetrical triangle between each monitor and your ears.
Connecting Studio Monitors to Your Interface
Most professional studio monitor pairs have a balanced input on each monitor.
Insert one of your balanced TRS cables into the back of the right studio monitor.
Plug the other end of that cable into the right balanced output on the back of your audio interface.
Repeat the same process for the left studio monitor – connecting it to the left balanced output via a second TRS cable.
For Beginners: What are Studio Monitors?
Studio monitors are specialized speakers for audio and music production.
They have a flat frequency response compared to consumer speakers which provide accurate, flat, and neutral sound reproduction in a controlled listening environment.
Their flat frequency response allows audio engineers and producers to hear the audio without any coloration or distortion, which allows them to make informed mixing and mastering decisions.
Microphone
We recommend using an XLR-to-XLR cable to connect a condenser, dynamic, or ribbon mic to your interface.
An XLR cable offers the simplest and best-quality connection.
Simply attach the appropriate end of your cable to a mic input on your interface. Then, connect the other end to your microphone.
Guitar
The last major device we’ll discuss connecting to your audio interface is a guitar.
A guitar has an unbalanced output so using an unbalanced TS cable makes the most sense.
Simply attach one end of this cable to your guitar output. Then, attach the other end to an instrument input on your audio interface.
Many interfaces have a dedicated instrument input. Otherwise, it’ll have a toggle to switch its ¼-inch input between line and instrument level.
Make sure you switch this input to “instrument”.
Other Audio Gear
Linking a mixer, compressor, or mic preamp to your audio interface isn’t necessary.
However, many audio and music producers use these devices to enhance the quality of their recordings.
These devices can help even out the dynamic in your audio (compressor), provide more control over audio levels and frequencies in real-time (mixer), or add warmth and character to your recordings (mic preamp).
Check out our in-depth guides on how to connect a mixer, mic preamp, compressor, and guitar amp to your audio interface to create a more professional setup.
How to Set up Your Audio Interface in Your DAW

In this example, we’ll go over how to set up your interface in FL Studio and Ableton Live.
However, the setup process is similar regardless of what DAW you use.
Open your DAW, in this case, FL Studio.
Select the Options tab.
In Options, select the Audio settings tab.
Under Input/Output section, select your audio interface from the device drop-down menu.
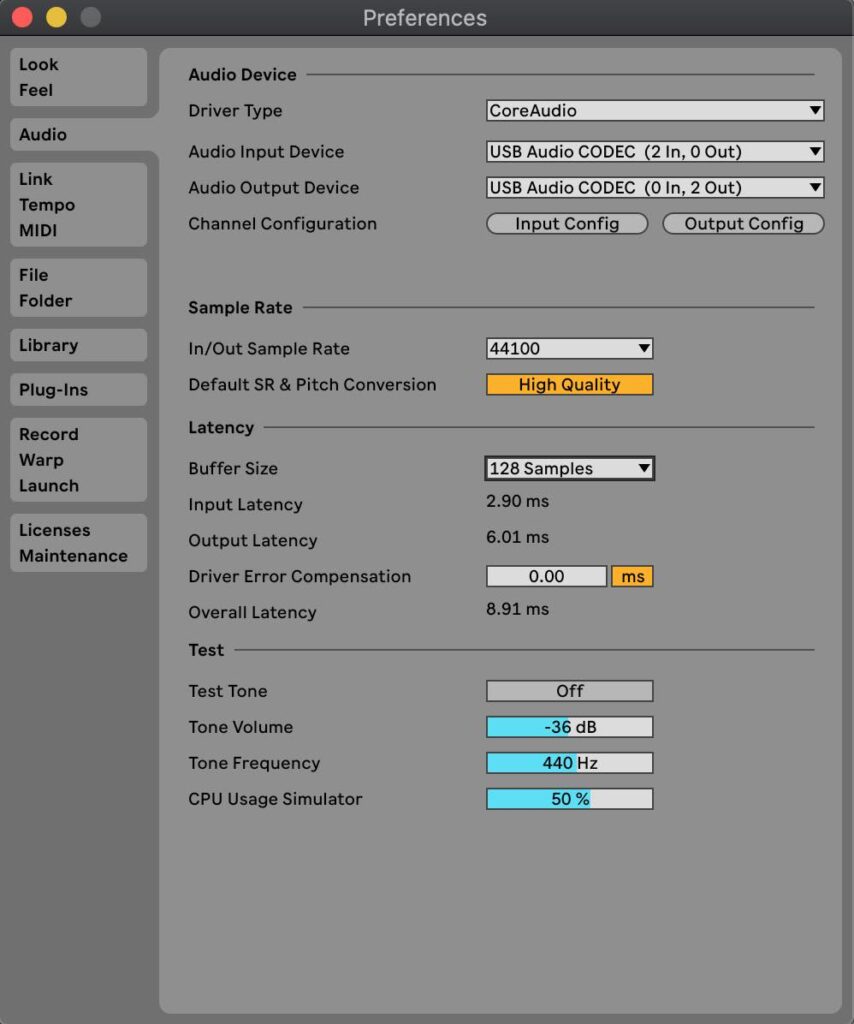
In Ableton, go to Preferences > Audio > Audio Device.
Set your “Audio Input Device” and “Audio Output Device” to your audio interface.
Sample Rate and Buffer Size – What Should You Set Them To?
Your sample rate and buffer size will influence your audio quality and CPU performance.
Sample Rate
A higher sample rate means your interface will capture more samples (per second) from the audio signals you record.
As a result, higher sample rates provide a more accurate and detailed representation of your audio.
However, it generates larger file sizes since your interface is capturing more samples.
Therefore, higher sample rates require more processing power to handle the increased amount of data.
I recommend setting your sample rate to the default 44.1 kHz (the standard for audio distribution) or 48 kHz.
Check out this article to learn about situations where you should consider recording at a higher sample rate.
Buffer Size
The smaller your buffer size, the fewer samples your computer’s memory will store in its buffer.
As a result, your CPU will have to work harder to keep up with incoming audio.
While smaller buffer sizes are more taxing on your CPU, they reduce latency by allowing for more immediate processing of incoming audio.
This is a simplified explanation of how buffer size works so if you’re confused check out this article that explains it in more detail.
What’s important to know is that the lower you set your buffer size the less latency you’ll experience. However, you’ll put more strain on your CPU.
On the opposite end, higher buffer sizes put less strain on your CPU but increase latency.
Generally, the sweet spot will be between 128 and 256 samples.
It’s always a good idea to test different buffer sizes and monitor your computer’s performance to find the best setting for your setup.
Generally, the more tracks you record simultaneously and plugins you use, the more you’ll have to increase your buffer to ensure a smooth performance.
Common Audio Interface Set-Up Problems – What To Do When You Run Into Them
What to Do When Your Audio Interface Isn’t Showing Up
If your audio interface isn’t showing up on Mac here are a few steps you can take.
First, you want to make sure your computer is picking up your interface.
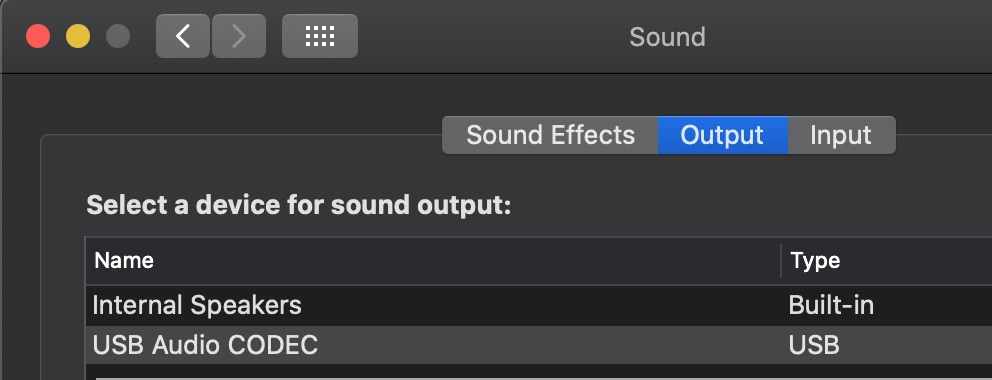
Go to System Preferences > Sound.
Under output and input, you should see your audio interface.
Another way to ensure your computer has identified your interface is to check the system information.
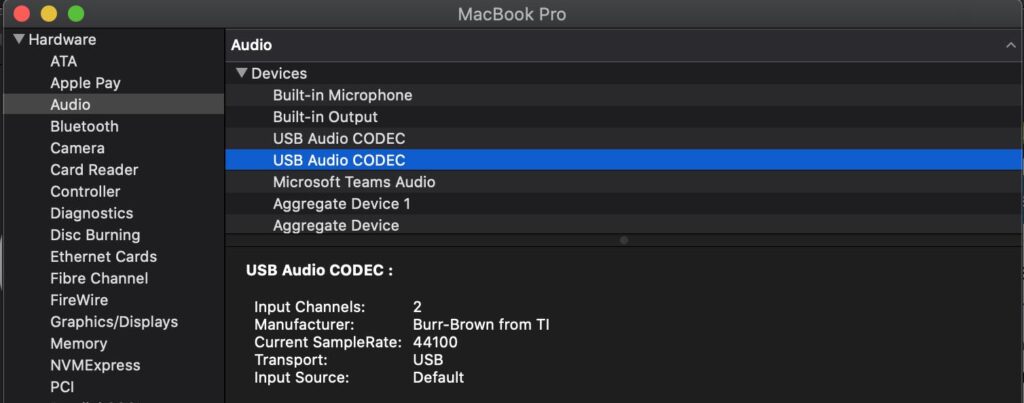
Go to the Apple Menu (in the top left corner) > About this Mac > System Report > Audio.
If you don’t see your audio interface, try reconnecting it.
You may need to install the latest driver from your audio interface manufacturer’s website.
If you have the latest driver installed, you may have a faulty USB cable or USB connection port.
Try a different USB port or replace your USB cable.
What to Do When Your Audio Interface Keeps Disconnecting
If your audio interface keeps disconnecting, I recommend using a different USB cable.
It may have an electrical short.
You can find a new USB cable here.
Before you try another cable, try another USB port on your computer to make sure it’s the cable and not your computer.
What To Do When Your Audio interface Isn’t Picking Up Your Mic
Make sure you’re using an XLR cable to connect your mic to your interface.
If you’re using a ¼” cable or an adapter, your interface may not pick up your mic.
I recommend only using ¼” cables for instruments and line-level devices.
If you’re using an XLR cable, (on Mac) go to system preference > Sound.
Your input may be set to “internal microphone”.
Select your audio interface as your computer’s input device.
Enable Phantom Power
Another reason your mic may not be working is that you don’t have phantom power enabled.
You won’t need phantom power for a dynamic mic, but you will for a condenser.
A condenser mic needs a phantom power source to provide voltage to its active electronic parts – its preamp and diaphragm.
So, if you can’t hear your mic, ensure you have phantom power enabled.
If you’ve followed these instructions and your microphone isn’t working, it’s possible that the audio interface or microphone is faulty and needs to be fixed or replaced.
Frequently Asked Questions
How Do I Connect a 3.5 mm Cable to an Audio Interface?
To connect a 3.5mm cable to an audio interface, you’ll need a ¼-inch to 3.5mm adapter.
Do I Need an External Mic Preamp With My Audio Interface?
No, you don’t need a mic preamp if you have an audio interface.
However, using one can be beneficial in some cases.
Audio interfaces have built-in mic preamps which boost weak microphone signals to a sufficient recording level.
These preamps tend to provide enough gain for a variety of recording purposes.
Here are some reasons why you may consider using a dedicated mic preamp:
You need more gain: If you’re recording using a microphone with a low output level, like a dynamic mic, external mic preamps tend to have more gain than standard audio interfaces.
You want better sound quality: Some external mic preamps deliver a warm and rich sound that can add character to a recording.
Takeaway: Setting Up Your Audio Interface
Setting up an audio interface can seem daunting at first.
But, with the right knowledge and tools, you’ll be able to capture professional-quality audio with ease.
Getting the most out of your interface comes down to understanding the basics of audio interfaces and their components and following the proper steps for connecting and configuring your device.